Contact Us

If you'd like to get in touch you can reach us at the following email addresses.

General Email: contact 'at' cardboardkeep.com

Press Enquiry: press 'at' cardboardkeep.com

Alternatively use the form on the right to contact us with general or press enquiries.

Cardboard Keep Video Policy
We hereby grant permission to any and all video content creators to use footage and gameplay of our games, and to place advertisements for the purpose of monetization in their videos of our games.
Please insert a link to our website in the video description, and feel free to contact us to let us know about the videos you make!


123 Street Avenue, City Town, 99999

(123) 555-6789

email@address.com


You can set your address, phone number, email and site description in the settings tab.
Link to read me page with more information.

combat-planning-blurred.jpg

Blog

Filtering by Category: Art

Dev Log: Texturing Levels in Warden

Timothy

TextureUVBlogBanner.png

Hey folks,

GrassUnwrap

Lets delve into our method for creating and texturing the levels in our upcoming game, Warden. Every level in Warden is built using Blender 3D. The base mesh of a level is created as a single, contiguous piece, with smaller details added in-engine later.

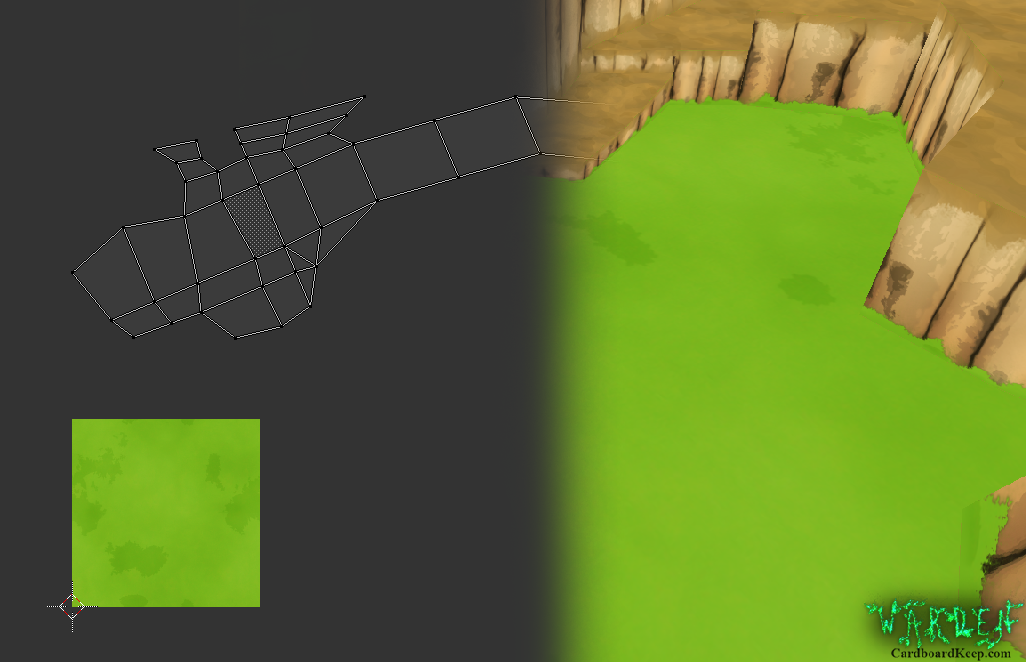
Textures are created or re-used based upon what and where the level is, and many variations upon them are used for blending purposes. The entire level is then UV mapped inside Blender. We apply textures to the faces of the level and export the mesh as an FBX. Doing so will cause Unity to create materials for each texture and assuming the texture is identically named within the project, this will automatically assign the correct texture to the material.

We do not embed our textures inside the level FBXs that would blow out the size of the project and cause double-ups of the textures in the project, which is just bloat.

This texture is used to connect a mud floor to a brick floor. It is created by blending the two in photoshop.

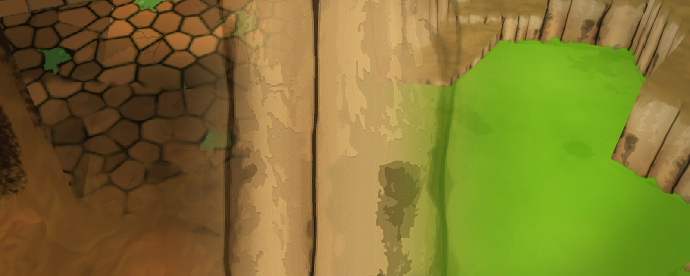
When texturing in Blender the process is simple. Textures come in three types. Tiling (On both U and V), tiling only on U (Horizontally) and tiling only on V (Vertically). Often walls of the level will need to tile horizontally while the floors will need to tile in all directions. Only very thin and tall objects will only need to tile vertically.

Generally speaking we will block out segments of our level with UV seams to divide the textures into easily managed islands. After laying down the base textures we can add extra seams to apply transitional textures to blend between texture sets.

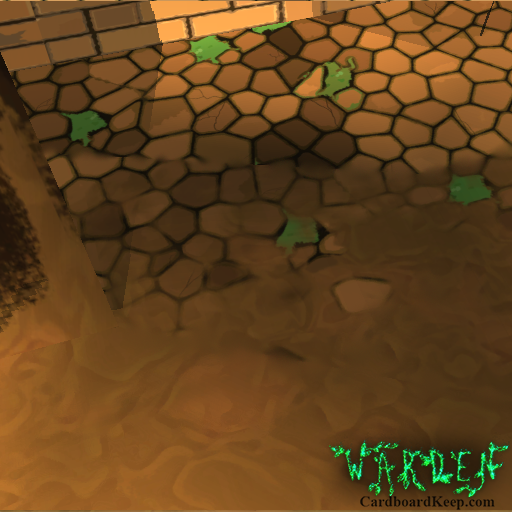
Tips and tricks: Texturing levels can be time consuming so ensuring solid mesh flow is key to not getting bogged down unwrapping. To avoid obvious seams you need to be careful about tiling textures and colours. Often large dark vertical shapes in the texture can be used to cover up a seam. making it much less obvious when playing the game.

This Cliff face connects grass to dirt and as such the unwrap is not pushed beyond the top and bottom of the texture.

Strengths of this technique:

  • Works well in unison with low-poly level geometry.
  • Easy to keep a consistent look and feel to areas.
  • Faster than tweaking unique textures for each level geometry.

Weaknesses of the technique:

  • Potentially uses a lot of textures (Texture atlases can help mitigate this).
  • Loses effectiveness with noisier textures (Takes much longer to make them line up right).

Happy texturing! Tim

Dev Blog: Quick and Easy Particle Sprites

Timothy

Hey Devs,

Today we're going to have a look at how to create particle sprites. There are a great many different kinds of sprites that one can paint however I’ll go through my basic technique here. It is really fast, and easy to get a lot of variation out of.

SpriteTute

Starting in Photoshop, I create a new document of 256x256. This is a huge sprite to make; most sprites we use get down-scaled to 64x64 or maybe 128x128. However I like to author my image large enough for the resolution to never become a problem.

With our blank image I use the gradient tool, set to radial from white to black. With the ruler tool I can start the gradient in the very center and drag it out to just before the edge of the document. This is the base that we paint our sprite details onto.

Smoke:

For a smokey particle, I create a new layer and use the Cloud filter. With adjustments from the levels tool I can blend this cloud layer with multiply to make the white base we started with become much more wispy.

The sprite however is now too circular, this can become quite noticeable in particle systems with few particles, to clean this up we can paint black into the base layer, this has the effect of essentially erasing the particle.

Fire:

For a flame effect, you need to know what kind of fire it will be and how your particle effect is going to function. Often you can get away with the same particles you use for your smoke, but if you you want to go the extra mile utilize an eraser with a hard falloff and use the chalk brush preset to give some harder edges to the flame sprite. For added effect you can apply the liquify tool and drag out tendrils of the flame, however this can quickly become messy and look nothing like fire.

Tips:

  • You can generate an alpha by pasting the final image into the alpha channel, or if you are working in Unity, you can simply tag the "import Alpha from greyscale" in the texture import options.
  • Setting the opacity of the sprite in Photoshop to 60 - 90% will give it a softer feel.
  • You could generate a series of these to create a sprite sheet, tweaking them via the warp tool, liquify, etc.
  • Be wary of dragging out long tendrils, these will make the sprite much more recognizable in engine.

Applying these techniques can quickly get you a variety of particles and often sprites designed for one thing work surprisingly well for another. Don’t be afraid to use the same sprite again and again but be careful how big and obvious those sprites become as players will pick up on the repetitive nature of them. Really, they are so easy and quick to make that unless you need to cull textures from the project, you may as well make another.

 Cheers guys, I hope this helps out for some quick particles. Timothy

Dev Blog: Alpha Outlines

Timothy

Hey guys,

In this blog post we are going to take a look at the use of alpha, and the horrible artifacts that can occur in it’s implementation. There are a wide variety of shaders that utilize the alpha channel of a texture to create transparent objects. These can range from glass to grass, but we are focusing mainly on how alpha can get those garish white or black outlines even though the alpha channel is crystal clear.

Examples02

The problem lies essentially in mipmapping, which is texture LoDing (Level of detail) using texture compression. So we need to understand that when the texture is compressed or mipmapped, the texture is changed from how one painted it. This is effectively rescaling the image and blurring the alpha.

Suddenly the texture that was once saying only show the nice tree leaves, is now telling the shader to show a slightly larger outline around the shape, due to the blurring of the texture. There are few options available here.

  • Don’t use mipmaps and texture compression (such as disabling them in unity).

  • Paint your own mip maps.

  • Paint an average approximation of the colour filling the rest of the texture.

Examples

By far the easiest and quickest solution is to fill the background of the image with a colour close to the borders of your image.

Alpha can cause a lot of annoying little problems, and I see this one pop up all the time. I hope it can help you guys out and if you have any tips for working with Alpha images, leave a comment.

Tim out.